
Application, Preparation
How to Stain & Protect Natural Wood | Jax Oleum Guide
Jan
How to Stain & Protect Natural Wood | Jax Oleum Guide
You’ve just had new wooden floors laid. Or maybe you’ve built a piece of furniture, renovated a door, or moved into a home with beautiful raw timber cladding. The question is always the same: what do I put on it? How do I treat, colour, protect, and bring out the natural wood grain without ruining it? If you’re starting from scratch, this guide is for you — and if you’re a seasoned carpenter or interior designer looking for a reliable, eco-friendly wood finishing system, it’s for you too.
Whether you’re a carpenter finishing a bespoke furniture commission, an interior designer specifying a wood treatment for a client’s project, or a contractor laying engineered flooring, the finish you choose — and how you apply it — makes all the difference. Jax Oleum is a proudly South African, single coat oil-based wood stain that protects, nourishes, and colours all natural wood surfaces in one clean application. This guide walks you through exactly how to get it right, every time.
From surface prep through to the final wipe-off, here is the full application process for Jax Oleum on all natural wooden surfaces. As a low VOC, eco-friendly wood stain manufactured in South Africa using natural raw materials and proudly locally made, Jax Oleum is the wood protection and natural wood care choice for specifiers and contractors who need both performance and environmental responsibility. It is non-toxic once cured, safe for use on indoor furniture, is food safe (frequently asked for chopping board applications), and suitable for projects ranging from a single wooden door to a large-scale commercial flooring installation.
Why the Application Method Matters
Jax Oleum is not a surface coating — it is a penetrating wood oil. Rather than forming a film on top of the wood, it reacts with the upper layers of the timber, sealing colour and nourishment directly into the grain. This means that how you prepare and apply it determines everything: the depth of colour, the evenness of coverage, and the long-term durability of the finish.
The good news is that Jax Oleum is genuinely simple to apply, making it an ideal starting point for wood finishing for beginners as well as a trusted tool for professionals. No spray equipment, no complex multi-coat systems — just a well-prepped surface, a clean cloth, and the right technique.
What You Will Need
Before you begin, gather the following:
- Jax Oleum in your chosen colour (1 litre covers approximately 25m²–50m², depending on wood species and porosity)
- Sandpaper — the correct grit for your wood species (see below)
- A clean, lint-free cloth or applicator pad
- A second clean cloth for wiping off excess
- A damp cloth for cleaning the surface before application
- A flat, well-ventilated workspace
Step 1: Know Your Wood
Jax Oleum works on all natural, uncoated timber. This includes solid wood, engineered wood, veneers, gum poles, cladding, roof trusses, doors, window frames, and furniture. If your surface has been previously painted or varnished, that coating must be fully removed before you begin — the oil cannot penetrate through an existing surface film.
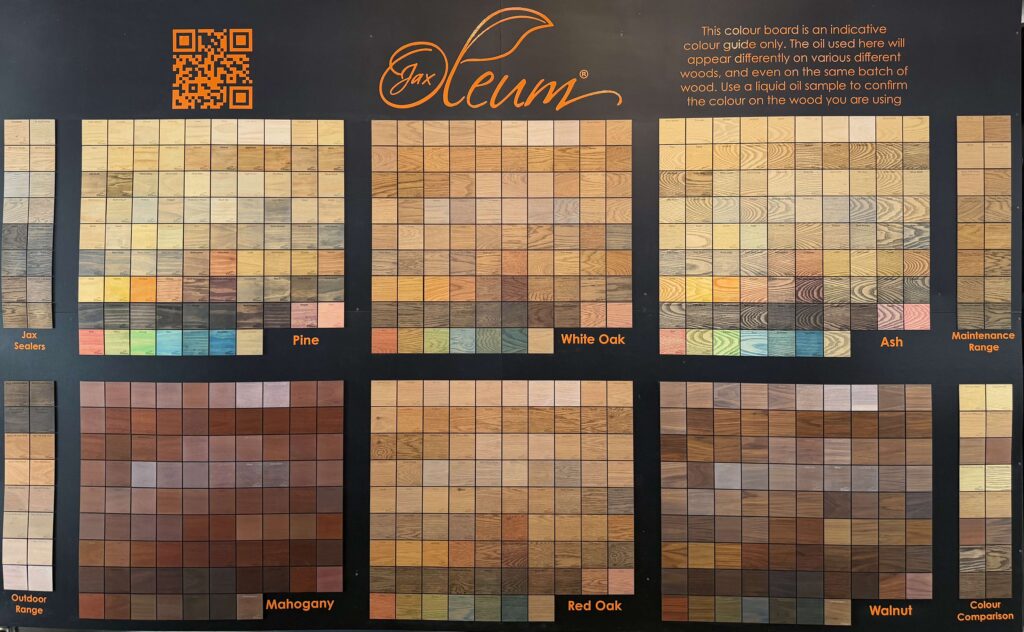
One important note for specifiers: Jax Oleum enhances whatever is already there in the grain. Test your chosen colour on a sample piece or inconspicuous area before committing to a full project. The porosity and natural tone of the wood species will affect the final colour result.
What Type of Wood Can You Treat with a Penetrating Oil Stain?
One of the most common questions from people new to wood finishing is simply: will this work on my wood? The answer with Jax Oleum is yes — provided the surface is raw and uncoated. Here is a quick reference for the most common applications:
Wooden floors and engineered flooring: One of the most popular applications. A penetrating oil stain like Jax Oleum colours and protects the floor in a single pass without leaving a surface film that can peel or crack over time.
Wood furniture: Whether it is a dining table, a coffee table, shelving, or a custom-built cabinet, Jax Oleum enhances the natural grain while providing protection against heat, water, and daily use.
Wooden doors and window frames: Particularly relevant in a climate with significant UV exposure and heat. A penetrating oil stain nourishes the wood from within rather than forming a brittle surface layer that can crack and peel over time.
Pine, oak, meranti, and saligna: These are the most commonly used wood species in South African construction and furniture-making. Each species absorbs colour differently — which is covered in the sanding and grit guide below.
Outdoor cladding, decking, and gum poles: For exterior wood protection in South Africa, where surfaces face intense sun, heat, and seasonal rain, a penetrating oil provides far more durable natural wood care than a surface coating. See the outdoor application notes further down in this guide.
If your wood has been previously painted or varnished, that coating must first be fully stripped back to raw timber before applying any penetrating oil stain. The oil cannot work through an existing surface film.
Step 2: Sand the Surface Properly
Sanding is the single most important preparation step. A well-sanded surface allows the oil to penetrate evenly and produces a consistent, professional finish. A poorly sanded surface will show up every flaw once the oil is applied.
Use the following grit guide as a starting point:
| Wood Type | Recommended Finish Grit |
| Softwood (e.g. pine) | 180 – 220 grit |
| Medium hardwood (e.g. meranti, saligna) | 120 – 180 grit |
| Dense hardwood (e.g. oak, ironwood) | 120 – 150 grit |
| Veneer surfaces | 120 – 180 grit (light pass only) |
| Engineered wood flooring | 120 – 180 grit (machine or by hand) |
Always sand in the direction of the grain, never across it. Work through grits progressively — starting coarser and finishing finer — to avoid deep scratches that the oil will highlight rather than hide.
Step 3: Clean the Surface Thoroughly
Once sanding is complete, remove all dust before applying the oil. Any sanding residue left on the surface will be sealed in by the Oleum and will affect the final result.
Wipe the surface down with a damp cloth and allow it to dry completely OUT. Wipe the dust off with a dry cloth, vacuum of blow off with compressed air On large flooring projects, a vacuum followed by a tack cloth works well. The surface must be dry, clean, and free from dust, oils, and adhesive residue before you proceed.
Colour tip: If you wet the sanded surface with a damp cloth before applying the Oleum, it will enhance the final colour by a shade or two darker. This is a useful technique when you want a deeper, richer result. Ensure the surface is only slightly damp, not wet, and allow any excess moisture to dissipate the surface to dry before oiling.
Step 4: Shake the Tin Well
This step is more important than it might seem. Jax Oleum contains pigment that settles during storage. Shake the tin very well before opening to ensure the colour is evenly dispersed throughout the oil. Inconsistent mixing will produce inconsistent colour results on the wood. Continue to shake and mix the tin during application too ,out
Step 5: Apply the Jax Oleum Oil
Using a clean cloth or applicator pad, apply in a circular motion , a thin, even layer of Jax Oleum across the entire surface. Applying an oil-based wood stain with a cloth is the preferred method — it gives you the most control over coverage and works the oil into the grain more effectively than a brush. Pour the Oleum directly onto the surface or onto the cloth/applicator pad you are using. Work methodically — section by section on large floors, panel by panel on furniture or joinery. With a wide range of colours available, Jax Oleum is one of the most versatile ways to colour and treat wood naturally in a single step.
Key technique points:
- Apply in a circular motion or in the direction of the grain for an even, natural result.
- Work in sections and keep a wet edge — you have at least two hours to blend and overlap areas without a visible join, depending on temperature and conditions.
- Apply thinly. More oil does not mean more colour — excess oil left on the surface will become tacky rather than penetrating.
- For machine application on flooring, use a buffing machine with a cloth or pad attachment — the same principle applies.
Step 6: Allow to Penetrate, Then Wipe Off the Excess
After applying the oil, allow it to penetrate the upper layers of the wood for a few minutes. You will see the surface begin to absorb the colour as the oil works into the grain — the wet, shiny look will gradually give way to a more even, matte appearance as the oil penetrates.
Once the penetration time has elapsed, wipe away all excess oil with a clean, dry cloth. This is a critical step — any oil left sitting on the surface will not dry evenly and will result in a sticky, uneven finish. Wipe firmly and thoroughly, following the grain or in a circular motion.
The result should be a clean, matte surface with the colour fully absorbed into the wood. There should be no visible sheen or wet patches when you are done.
Important safety note: Used cloths and applicator pads saturated with oil-based products can spontaneously combust if left bunched up or disposed of incorrectly. Once you are done, thoroughly wet all used cloths with water before disposing of them in the bin. Do not leave used cloths bunched up or in a bin without first wetting them.
Special Consideration: Outdoor & Decking Applications
For wood that lives permanently outdoors — decking, cladding, gum poles, pergola structures — wood protection in South Africa comes with unique demands. The intense UV exposure, heat, and seasonal rainfall mean surface coatings that peel and crack are simply not suitable. For outdoor applications, Jax Deck Oil is the correct product rather than Jax Oleum — it is specifically engineered for permanent outdoor exposure. The key considerations for outdoor application are:
- Ensure the wood is completely dry before application. Moisture trapped beneath the oil will cause it to lift or not bond correctly.
- Apply in moderate temperatures and out of direct midday sun where possible — the South African heat can cause the oil to dry too quickly on the surface before it has fully penetrated.
- Jax Deck Oil is a urethane-modified formulation designed for high foot traffic and permanent outdoor exposure — contact us for application guidance specific to your project.
- Plan for annual maintenance oil reapplication to outdoor surfaces to maintain protection and colour depth over time.
Do You Need a Sealer on Top?
For most interior applications — furniture, wall cladding, doors, and window frames — Jax Oleum as a standalone finish is sufficient. It provides strong protection against water, heat, and sunlight, and the natural matte finish is often exactly what designers and specifiers are looking for.
However, for surfaces that take heavy use — and this is especially relevant for wooden floors in busy homes or commercial spaces, as well as bar counters and restaurant table tops — applying Jax Oleum’s 2K water-based matt sealer over the fully dried oil finish significantly increases durability and water resistance. That process is covered in detail in our next guide.
Pro Tips at a Glance
- Always test your colour on a sample piece before applying to the full project.
- Shake the tin thoroughly every time before use — even mid-project if working over a long session.
- Cooler, overcast conditions give you more working time than hot, dry days.
- A thinner coat applied well always outperforms a heavy coat applied quickly.
- Close the lid tightly, label and store used Jax Oleum for future touch-ups — colours can be mixed to create custom shades for complex projects.
- On veneer surfaces, use a lighter hand and a finer grit when sanding — veneers are thin and require a more delicate approach.
Frequently Asked Questions
How many coats of Jax Oleum do I need?
One coat is all that is required. This is one of Jax Oleum’s key advantages — a single application colours, nourishes, and protects the wood.
How do I make the colour darker?
There are two ways to achieve a deeper, richer colour result. First, you can select a darker shade from the Jax Oleum colour range. Second, you can use the wet surface technique: lightly dampen the sanded surface with a cloth before applying the Oleum — this enhances the final colour by a shade or two. Ensure the surface is only slightly damp, not wet, DRY before oiling.
How long does Jax Oleum take to dry?
Drying time varies depending on temperature, humidity, and the porosity of the wood. In normal South African conditions, the surface is typically dry to the touch within a few hours. If you are applying a sealer over the Oleum, allow a minimum of 24 hours drying time before doing so. Avoid foot traffic on floors for at least 24 hours.
Can Jax Oleum be used on previously treated wood?
No — Jax Oleum requires raw, natural wood to penetrate correctly. All existing varnish, paint, or surface coating must be fully removed and the wood returned as close as possible to its natural state before application.
How much does 1 litre cover?
One litre of Jax Oleum covers approximately 25m²–50m² depending on the species and porosity of the wood — denser, smoother timbers at the higher end and more porous or textured woods at the lower end. This still makes it highly cost-effective for both residential and commercial projects.
Is Jax Oleum food safe? Can I use it on a chopping board?
Yes — once fully cured, Jax Oleum is non-toxic and food safe, making it a popular choice for chopping boards, wooden serving platters, and kitchen surfaces. Ensure the oil is completely dry and cured before the surface comes into contact with food. If you are unsure, contact us directly and our team can advise on your specific application.
How long does the finish last? Does interior wood need maintenance?
On interior surfaces in normal use, Jax Oleum provides long-lasting protection that does not need routine reapplication. Over time, heavily used surfaces such as floors, countertops, and dining tables may benefit from a light maintenance coat to refresh colour depth and protection — simply clean the surface thoroughly, lightly sand if needed, and reapply. Because Jax Oleum is a penetrating oil rather than a surface film, there is no peeling or cracking to deal with, and maintenance is straightforward when it is eventually needed.
Ready to Start Your Project?
Jax Oleum is available online and through stockists across South Africa. With an extensive range of colours to choose from — and the ability to mix custom shades for bespoke projects — there is a finish for every brief. Interior designers, shopfitters, and contractors are welcome to contact us directly to discuss trade accounts, project specification, and volume requirements.
- Shop online
- Visit our showroom in Sandton (Block K, Georgian Place, 18 Southway, Kelvin) or our new Cape Town showroom — where you can see sample displays, feel the finishes in person, and get expert guidance from our team.
- Join one of our monthly training days at our Sandton premises, led by our colour specialist — covering application technique, colour selection, and product guidance. Reserve your place here.
- Request your free 20ml oil samples or White Oak sample blocks for project specification.
And when your Oleum application is done? Read our next guide — when and how to apply the Jax Oleum 2K Matt Sealer for added durability on high-use surfaces.